Develop performant blog with Qwik and Supabase
03. Create project and strucutre

Here we finally got to the practical (but not too much) part. As anticipated we will use the Qwik framework for the development of our blog and in this article we will start with the creation of the project.
Topics
- Introduction to the Qwik Framework
- Project creation
- Project structure
- Conclusion
1. Introduction to the Qwik Framework
Qwik is a young and fresh framework, has a very active community, is open source, and releases of new versions are almost weekly for now.
One of the main features of this framework is the excellent performance due to the fact that pages are rendered through the process of resumability and not hydration.
Here are two excellent articles explaining the differences between resumability and hydration:
Beyond this detail, it is appreciable that they valued the code experience by making the framework already accessible to those who already developed with React/Next.js.
I’ll stop here; I don’t want to go into too much detail. You can find more information at the official website Qwik.
2. Project creation
Well, here we are at the creation of the project. Personally as a package manager I use pnpm but you are free to use whatever you prefer. Let’s get started!
npm create qwik@latest
pnpm create qwik@latest
yarn create qwik
bun create qwik@latest
Having executed one of the above commands we will need to define some parameters:
- Project Name: pokemall
- Starter: Basic App (Qwik City + Qwik)
- Install Dependecies: No
- Initialize Repository: Yes
Having created the project, before proceeding to install the dependencies, we move the contents within an app folder because we will need to create a dedicated Supabase folder within the project root.
We enter the directory and install the dependencies, in my case, with pnpm: cd pokemall/app && pnpm i.
We start the project by running the pnpm dev command, and we can launch the app locally and navigate to the initial project.
If everything is working properly we will do some cleanup of folders and superfluous code.
From the src folder we remove the folders and files:
- components -> starter
- media
- routes -> demo
- routes -> styles.css
We edit the file router-head.tsx inside the components folder:
const  RouterHead  =  component$(() => {
  ...
});

export  default  RouterHead;
components/router-head/router-head.tsx
We add an index.ts file to export the router-head.tsx component to the same folder:
export { default  as  RouterHead } from  './router-head';
component/router-head/index.ts
We add an index.ts file to the root of the components folder:
export  *  from  './router-head';
components/index.ts
Finally we modify the import in the root.tsx file:
...
import { RouterHead } from  './components';
...
root.tsx
With this structure we will be able to import all the components we create from the /components folder.
We fix the layout.tsx, index.tsx files and delete the entire contents of the global.css file:
import { component$, Slot } from '@builder.io/qwik';

export default component$(() => {
  return (
	<>
	  <main>
		<Slot />
	  </main>
	</>
  );
});
routes/layout.tsx
import { component$ } from '@builder.io/qwik';
export default component$(() => {
return (
<div>
<h1>Hello Qwik App!</h1>
</div>
);
});
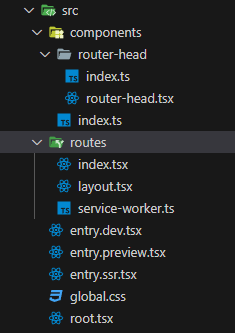
routes/index.tsxHaving reached this point you should have a similar structure:

3. Project structure
src/components
Within the components folder we are going to create all the necessary components and use the Atomic Design Pattern in order to divide the components into atoms which are the smaller components such as buttons, inputs, etc., molecules compound components that can include one or more atoms such as a search input, form input, card, etc., organisms which are the components composed of one or more molecules such as forms, navbars, etc. and the templates which are basically layouts composed of multiple organisms.
src/routes
Here we are going to define the site routing system, each folder corresponds to a path and inside it can contain a layout and must necessarily contain an index.tsx file that will contain the page definition.
public
In the public folder we will put all the assets such as favicon, fonts, sitemap etc.
src/entry.*.tsx
The entry.* files define the entry points of the app and depend on the command we run.
In development, running the pnpm dev command will execute the entry.dev.tsx file, if we want to see what our app will look like in production instead we can run the pnpm preview command which will execute the entry.preview.tsx file.
src/root.tsx
This is the first file that will be rendered and contains the <RouterOutlet /> component that is responsible for rendering the pages we created based on the routing.
4. Conclusion
We are finally getting into the thick of the project. We are still in a preparatory phase but we are very close to the development of our blog. In the next article we will install some main dependencies and start configuring Tailwind with some plugins that will be useful for our blog.
01. Project Overview
02. Design sitemap and template
03. Create project and strucutre 👈
04. Qwik and Tailwindcss
05. Build main layout | Cooming Soon